Thursday, October 30, 2014

Creating a Cloffice or Closet Office

I posted a few teaser pictures on my Facebook  of what I was planning on doing with my random closet we have in our living room. The response was awesome so I told everyone I would blogpost the results. I'm keeping my promise... just a few weeks late. haha Such is life.

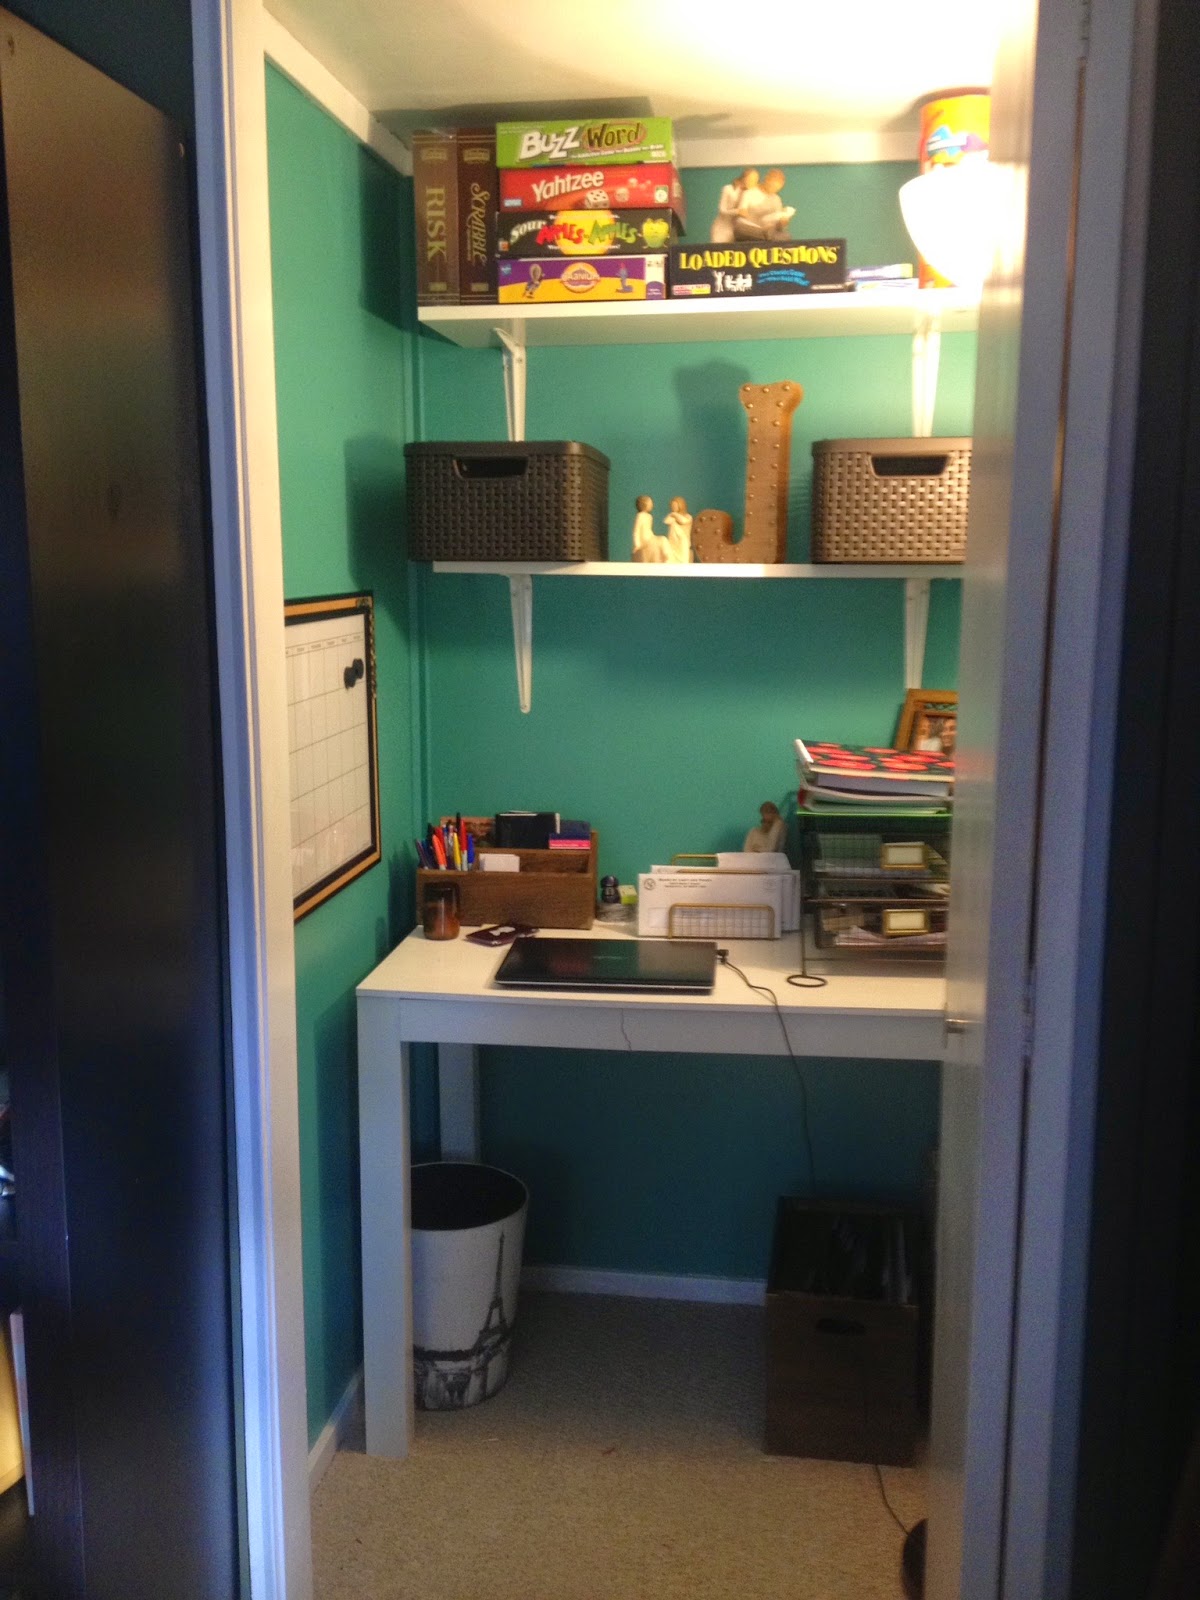
I started out with a closet that was collecting crap. 


Ya know, the usual: luggage, paper shredder, board games, and everything else still in boxes from our move that I didn't feel like unpacking quite yet. It took me a good hour to find new homes for all of this  move everything to the garage. Once it was empty I could begin. 

Step 1: Pick a paint color. 
Here's the trick: you have to pick a color that is going to keep you alive and awake. When you have a cloffice you are basically staring straight into closet. Now the rest of my upstairs is neutral. Forest green, deep tan, and white trim. I thought about picking a neutral color to coincide with my living room scheme. Seriously, though, who wants to stare at a neutral color??!?! Also I lucked out on the chance that my husband (the more "neutral" of the 2 of us) was traveling for work the entire week. I didn't have to consult anyone besides myself! My options were endless!! Off to Lowe's!!! Upon arrival I was quite overwhelmed but I was scanning some paint swatches and the same color kept screaming "PICK ME! PICK ME!!!". It was just meant to be. Enter turquoise.  Or aqua. Whatever you want to call it. I loved it. 


Step 2: Paint during nap time.
Yeah don't even bother trying to start this while the kid(s) are awake. Absolutely not. I painted one coat during nap time and shut the door. Wrapped it up with a second coat that night after bedtime and painted the ceiling and trim a bright white that I had leftover from the nursery. Good lord it looks fantastic. 


Step 3: Measure everything. Twice. Three times. 
Because if you don't you will realize too late that your Ikea shelves from the past apartment actually don't fit in the closet and you actually do need to run to Menards and get shelving. 

Step 4: Get generic shelves.
They had the cute shelves that would've cost me almost $80. I was freaking out and thinking I couldn't have shelves anymore when a really nice Menards guy helped me find the boring shelves that are perfect for closets and knocked my cost down to less than $30. My husband really likes this guy now. 

Step 5: Install shelves with a level. 
I don't own one. My shelves are crooked. I don't want to talk about it.


Step 6: Minimalism is your motto.
When you have such a small space to work with, keep it simple. I used the top shelf for board games and the second shelf for baskets of crafts and paper work. I also found (hello, Target) an adorable filing cabinet made of wood!! It's slim and keep everything super organized for me! 

Step 7: Step back and admire!!!! This really was a simple project. A few more trips than I had planned but ended up being well worth it!!! 


This was a really fun project! Let me know what you think!! 

My husband's reaction? "Oh... that's babe.... I'm just really glad that color is in a SMALL space!" haha I love that man. 


xoxo,


Summer 


Monday, October 27, 2014

Fighting Fear with Failure

Hello loves!!!
I've been wrestling for weeks and I finally must process this outside of my brain.

The only people who overcome their fears are those who are willing to fail. 


You can't demand perfection of yourself. You can't expect to know everything. You can't wait until you do know everything. You just have to try, attempt, step out, DO SOMETHING and begin to put your dreams in motion. It is the only way of accomplishing anything.

I have, for far too long, talked, dreamed, brainstormed, wished and fancied a career in writing. I want to share whatever small knowledge I have in my world with anyone that it might possibly help. I have been trapped, however, in a little cage of fear. Fear that it won't help anyone and fear that no one will care.

I've been a big scaredy-cat. I've been wishing I could be someone that I already am if I would just do what I am capable of doing.

It's the same for YOU. You already know the goal... you've been thinking about it since you saw the word "fear" in the headline. It's right there...and you have what it takes to reach it.

Start small. Take risks. When we think about risks our first thought is usually financial, but usually that isn't even a factor. Unless you are literally starting your own small business (way to go, by the way!!) most risks involved in facing our fears are actually mental and emotional. I'll let you in on a secret though. It's the key to protecting your emotions and not getting hurt on your road to success. You just have to know one thing.

You're are going to fail.

There. Process it now. Feel it. Let yourself cry for a moment. Failure is a fantastic key in the process of success. Maybe 'fantastic' is a strong word, but it's necessary. You need to grow, develop, and stretch out those wings. You have to hit a few roadblocks to get going in the right direction. The average novel writer pushes out 4-13 drafts before a Final Draft is formed. That is a lot of failures and red ink before getting approval from someone else. You have to know that you won't be producing rainbows and unicorns your first try. Maybe you will. Maybe you will be the random person who just does it perfectly the first time. In that case you don't need me and you may feel free to move on. For the rest of us Average Joes we are going to have a lot of rough drafts before we find success in whatever form you see that as.


It's what you DO with your failure that determines your outcome. Learn from it. Dissect it. Find out why it didn't work and change. 

You are choosing to jump off the cliff, knowing you're going to hit a few rocks on the way down before you learn to fly. <--- cheesy metaphor insert. That's just the way it works.

I'm calling you out on your fear. Face it and embrace it. Behind fear is usually where our deepest passions lie. The only way to fight it is to try. 

I'm hitting it head on from now on. What about you? What do you fear most and what are you going to do about it? 


I'd love to hear from you in the comments below!! 

xoxo,

Summer 

Tuesday, October 21, 2014

Chili and Cornbread Recipe

Quick update on my ongoing fitness journey before I head into the MOST AMAZING chili and cornbread recipes you've EVER had.

I have 2 more weeks of P90x3 left. My cleanse went exactly as planned and worked like a charm. I lost 6lbs total and had "skinny face" for my family photos (which I will be posting a few favorites SOON). They turned out fantastic and I felt so skinny and confident. I'm just so proud of myself for getting this far in my journey. It's be a rough road that sometimes feels rockier than other times, but it has always been worth it.

Remember, the choices you make to better your health and get the body that you were created to have will always be worth the sacrifices you make. Sometimes I'm the girl who says we can't eat there because I won't be able to find anything healthy and everyone gives you that look. It's worth it. Sometimes my groceries are boring. Sometimes I don't get the quick emotional fix of a doughnut and I just have to actually work through my true feelings. It's worth it. I'm going to be strong. I will keep up with my daughter on the playground. I'll be able to help my daughter practice sports. I'm going to enjoy my 50s and 60s with my husband just as much as our 20s. It's all worth it.

 Now onto the best Chili and Cornbread Recipe you've ever tasted! No joke this really is amazing. I even took this recipe to a large gathering where everyone was bringing different types of chilies and multiple people kept coming up asking what I put in mine that makes it soooooooo good.

The secret is this: nothing. I keep it so basic and I think basic recipes have gotten lost in world of foodies and culinary art. Most people are trying to create your grandmother's basic chili and then put 20 different seasonings in it that you would have to travel half the world to find. The result is chili, but not your grandmother's.

Here's to my grandmother, one of the best cooks I know.


Basic Chili

1 lb Ground Turkey (ok I actually grew up on ground Venison but I don't have any on hand)
1 sweet onion, chopped
1 T Worcestershire sauce (admittedly I put this in almost everything)
1 Green Pepper, chopped
1 Yellow Pepper, chopped
1 Orange Pepper, chopped
1 can Dark Red Kidney Beans (no sugar added), rinsed
2 cans Chili Beans (no sugar added) NOT rinsed
1 Qt Stewed Tomatoes (semi-blended so it's not so chunky)
1 T chili powder


Brown burger, onion, W sauce, for 5 min. Add peppers. Continue cooking until burger is completely browned and peppers are softening. Add beans and stewed tomatoes. Add chili powder. 
Let it simmer for 30 min. Taste test. If it's too acidic you can add 1 tsp of sugar. (it won't kill you, I promise)


Now onto the Cornbread. This has been a 3 year process for me. It can be SO HARD to find a good cornbread recipe. Too sweet. Too bland. Too crumbly. Corn or no corn. This is not something I choose to "healthify", but recently I did switch out the sugar for honey and was in HEAVEN. I have learned a lot of lessons and literally burned my way to finding the best cornbread recipe. Enjoy.


Johnston Cornbread

4 eggs, separated
1 C Buttermilk (or 1C reg & 1T vinegar, let set for 5 min) 
1t Vanilla
3/4 C butter, melted, cooled
1 C cornmeal
1 C Honey 
1T Baking Powder 
1t salt
2 C flour 
1 can Creamed Corn


Preheat oven to 375. Put egg whites in your mixer with whisk attachment and let it go to town while you do everything else because you  need them to form stiff peaks it takes FOREVER if you do it by hand. Combine egg yolks, milk, cooled butter, and vanilla in a bowl. Mix in honey and creamed corn. Stir in flour, cornmeal, salt, and baking powder until just combined. Don't go crazy. Fold in eggs whites slowly until mixed in evenly. Pour batter into greased 8x8 pan and bake for 40-45 min. Check center with a knife or toothpick until it comes out clean. 

This has BY FAR been my most successful cornbread venture to date. This recipe  is the best I found, and then adapted to create what I really wanted. 

I hope your family enjoys these recipes on a cold, fall evening. I'm horribly addicted to chili, so any semi-brisk day I am quickly pulling out my cans of beans! 


What is your favorite kind of Cornbread? Sweet? Plain? Do you love corn in yours? Let me know in the comments below!! 


xoxo, 

Summer 

Thursday, October 9, 2014

Kill Sugar Cravings and Lose the Bloat

In my last post I talked about having to hit the reset button after a week or so of crazy binge eating. So easy to write about, not so easy to implement. Sugar has this lovely way of being literally addictive and once you start consuming it on a regular basis your body starts to crave it on a regular basis.

This means COLD TURKEY. The best way to beat it is to kill it. Now I don't know if you've ever tried to give up sugar completely but it sucks. Bad. You are actually going through withdrawal and it does not feel good. Headache. Stomach cramps. Depleted energy levels. I can't focus on anything. It is crazy hard to do and crazy awesome to accomplish. But I've found a better way. Or at least an easier route.

Shakeology. I do have an entire page dedicated to it on the tabs above, but let me just say that I love love love this stuff! I drink it everyday and my hair, skin, and nails are fantastic! I have crazy amounts of energy and I'm getting all the weird awesome vitamins the earth has to offer without having to go dig them up for myself. All of these are great benefits of Shakeology. My favorite, though? It kills sugar cravings. I've given up sugar a few time in my life and when I do it with Shakeology it is so much less painful.

The taste first of all is YUMMY. I've switched to the Chocolate Vegan since I'm trying to move in that direction with my life... slowly but surely. It tastes like a chocolate shake and depending on how you mix it you can create a "Frosty" texture or more of a "smoothie" texture. It comes in a variety of flavors (Strawberry, Chocolate, Greenberry, and Vanilla) so it's impossible to get bored with it, plus there are TONS of creative recipes online.

That is my Shakeology soap box... but what I'm really talking about is the cleanse. This was created by people who use Shakeology daily and wanted to step it up a notch and use it to it's fullest potential.

You can do either a 3 day Cleanse or a 5 day cleanse. My hubby happens to be traveling this week AND we are getting family photos done on Sunday so this was the perfect moment to crush my cravings and lose a little bloat and what I like to call "puffy weight" from my face. My face is talented at retaining water weight. I'm looking to have a skinny face in these pictures!


It seems crazy, but Shakeology is a full meal replacement shake. This means it has all the vitamins, proteins and nutrients that I would need for a full meal. This is not a protein shake on steroids. As you can see from the picture it is 3 Shakeology shakes, 2 optional fruit servings, and one salad with a 4oz protein. I've had a plain chicken salad the last 2 days now with a low fat olive oil based dressing. My shakes I've mixed with just ice, water, and a teaspoon of caramel extract because I like it that way. 

I'm currently on Day 2 and will continue until Sunday when we do the photos!!! I'm only down a pound right now, but this is really about not wanting sugar so badly, resetting my healthy eating habits, and losing the bloat! If I lose a few pounds along the way, which is super common, then so be it! 

If you're interested in purchasing a 3 day cleanse worth of Shakeology (9 packets) please email me @ summerfitness12@gmail.com 


xoxo, 


Summer 


blogger template by lovebird